The Trail
 The main
trail, known as the Central Circuit, can be completed
in about 4-10 days, depending on the itinerary one
chooses. More trails are being developed, and we
promise to bring you information on them as soon as we
have it The main
trail, known as the Central Circuit, can be completed
in about 4-10 days, depending on the itinerary one
chooses. More trails are being developed, and we
promise to bring you information on them as soon as we
have it
The central circuit is divided into stages, with
each stage beginning and ending at an established camp
site. Each stage is designed to be covered in a single
day. The trail begins at the Park entrance in Nyakalengija, passes
through Nyabitaba
Camp, heads through John Matte Camp,
Bujuku, Elena (optional), Kitandara, Guy Yoeman,
returns to Nyabitaba before heading back down to
Nyakilegija.
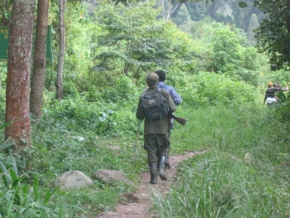
Throughout your journey you will be accompanied by an
armed ranger, a guide and of course your porters. It
pays a great deal to engage them. Though their English
is not always up to par, you will find them very
interesting, highly knowledgeable and friendly.
More experienced trekkers may wish to discuss
alternative itineraries with their guide (it is
perfectly acceptable to skip some stages), although it
is wise to give due consideration to your guide's
advice!
Day 1: Nyakalegija - Nyabitaba
 This first day's journey begins at the Park
Headquarters. An early start is advised, as you don't
want the hot tropical sun beating down on you as you
attempt the steep sections! The trail passes along the
western bank of the Mubuku River, passing through
villages, leading up to the Park entrance. It takes
about 45-minutes walk to get to the Park Entrance. (Be
sure to have your receipts ready for inspection by Park
authorities) This first day's journey begins at the Park
Headquarters. An early start is advised, as you don't
want the hot tropical sun beating down on you as you
attempt the steep sections! The trail passes along the
western bank of the Mubuku River, passing through
villages, leading up to the Park entrance. It takes
about 45-minutes walk to get to the Park Entrance. (Be
sure to have your receipts ready for inspection by Park
authorities)
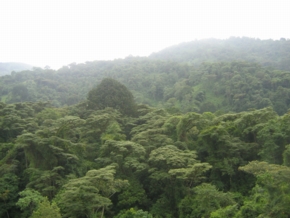
At the Park entrance, the trail slopes down towards
the river, passing through lowland equatorial
forest. Reaching the river, the path bears left away
from the river, through more forest until one comes to
a small bridge. Crossing the bridge, one
starts climbing a moderately steep ridge. Elephants
inhabit this area, and evidence of their presence
(improbably large mounds of dung, huge passageways in the bush) will be
seen. A word of caution: The elephants in this area are not very
friendly, thanks to poaching activities during years
past. Your guide and ranger are trained to detect
elephant presence quickly and react to ensure your safety!
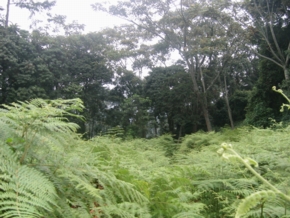 Elephant territory on this section ends at Mahoma
bridge, some 2hrs into the journey. Mahoma bridge is a
good resting place. Have some refreshments because up
ahead is one of the longer and steeper climbs of this
section. This part, which should take you the better
part of an hour to conquer, passes through more forest (where,
if you are lucky you may see monkeys and chimpazee),
then through a field of ferns. As you gain more
altitude, you will notice hanging moss growing on tree
branches, and subtle changes in the forest vegetation,
as trees become more spindly, and undergrowth thins.
Elephant territory on this section ends at Mahoma
bridge, some 2hrs into the journey. Mahoma bridge is a
good resting place. Have some refreshments because up
ahead is one of the longer and steeper climbs of this
section. This part, which should take you the better
part of an hour to conquer, passes through more forest (where,
if you are lucky you may see monkeys and chimpazee),
then through a field of ferns. As you gain more
altitude, you will notice hanging moss growing on tree
branches, and subtle changes in the forest vegetation,
as trees become more spindly, and undergrowth thins.
You should arrive at Nyabitaba Hut about 4-5hrs after
leaving the Park HQ. (You should feel dog tired. This
is normal!) This is your Day 1 rest camp,
where you will spend the night. More information about
Nyabitaba can be found here.
Day 2: Nyabitaba - John Matte
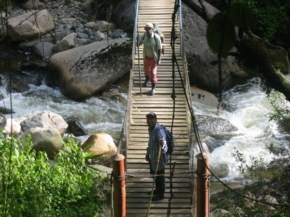 Day 2 is considered by many
to be one of the harder treks. Starting out early, you
will proceed up the Nyabitaba ridge and then descend
down into the Mubuku River valley, to cross the
confluence of the Rivers Mubuku and Bujuku at the
Kurt-shaeffer bridge (a magnificent piece of simple,
yet effective suspension bridge construction). After the crossing,
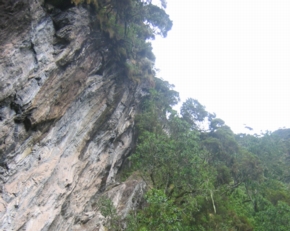
you will begin to climb rather steeply (and perhaps wonder
whether this whole trek was one big mistake on your
part). This part of the trail leads you through bamboo
forest, along a ridge that overlooks the Bujuku River
valley. As you climb you are surrounded to the left and
right by massive cliffs. Day 2 is considered by many
to be one of the harder treks. Starting out early, you
will proceed up the Nyabitaba ridge and then descend
down into the Mubuku River valley, to cross the
confluence of the Rivers Mubuku and Bujuku at the
Kurt-shaeffer bridge (a magnificent piece of simple,
yet effective suspension bridge construction). After the crossing,
you will begin to climb rather steeply (and perhaps wonder
whether this whole trek was one big mistake on your
part). This part of the trail leads you through bamboo
forest, along a ridge that overlooks the Bujuku River
valley. As you climb you are surrounded to the left and
right by massive cliffs.
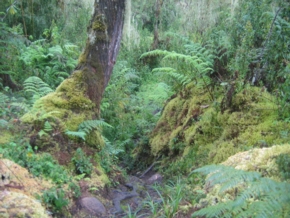
Bamboo forests rapidly give way to moss-covered high
altitude forest. As one rises higher, the amount of
moss increases. Most of this section is also
characterised by massive boulders, which contribute to
the general difficulty of this part of the trek, as
one has to keep climbing over them.
 About 3 hours into the trek, one reaches Nyamileju
hut, a camp that has now been abandoned. This is
usually a good point to have a spot of lunch, and rest
briefly before proceeding. The rest of the journey
continues to follow the Bujuku River valley, rising
steadily, passing through moss-covered corniferous
forests (beware protruding roots that trip one
easily), towards John Matte.
About 3 hours into the trek, one reaches Nyamileju
hut, a camp that has now been abandoned. This is
usually a good point to have a spot of lunch, and rest
briefly before proceeding. The rest of the journey
continues to follow the Bujuku River valley, rising
steadily, passing through moss-covered corniferous
forests (beware protruding roots that trip one
easily), towards John Matte.
Near John Matte camp, if you are lucky you should get
your first glimpse of Mt. Stanley and Margherita (the
highest peak). As the weather on Mt. Stanley changes
frequently, Margherita will typically appear and
disappear over the course of this part of the journey.
A final climb, past the first signs of bog, and
through some giant lobelia, and you arrive at John
Matte Camp. Expected journey time is 5-7hrs
depending on level of fitness.
Day 3: John Matte - Bujuku
 The trail to Bujuku camp heads west out of John
Matte, crossing the Bujuku River, and heading out over
the Lower Bigo Bog. This presents the first encounter
with Bog, a kind of high-altitude swamp. Gumboots and a
walking stick are essential equipment in this territory,
and it pays to watch and listen to your guide. One
wrongly placed foot, and you will find yourself
waist-deep in mud!
The trail to Bujuku camp heads west out of John
Matte, crossing the Bujuku River, and heading out over
the Lower Bigo Bog. This presents the first encounter
with Bog, a kind of high-altitude swamp. Gumboots and a
walking stick are essential equipment in this territory,
and it pays to watch and listen to your guide. One
wrongly placed foot, and you will find yourself
waist-deep in mud!
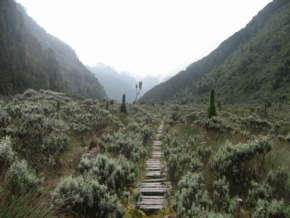
After crossing Lower Bigo, the trail leads
upwards to Bigo Hut, an abandoned camp. From Bigo
Hut, the trail climbs up a steep incline, leading up
to Upper Bigo Bog. Wooden slats have been placed over
the bog to make it easier to cross.
This part of the trail has a number of interesting
plants, including giant lobelia and
Everlasting Flower (said to have a 40-year
flowering cycle). While breathing will be getting a
little difficult and the body under more strain, it
is worthwile taking time to savor the beauty of this
part of the trail.
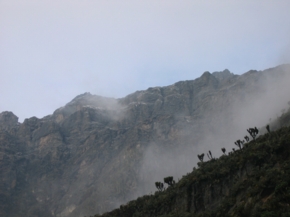
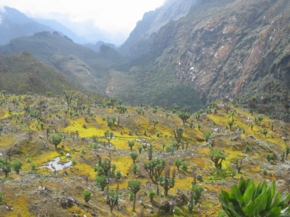
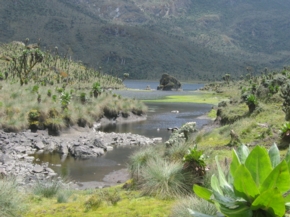 Out of the bog, and a short climb later, Lake
Bujuku will be sighted. Giant groundsel abounds.
To get to Bujuku
Hut, Lake Bujuku is skirted to the
east. This is no easy task as the banks are
generally quite muddy even in the dry
season. Bujuku Camp is fairly cold, but if you are
lucky there may be a spot of afternoon sunshine to
warm you up. You will almost certainly need to dry
off a few clothes (yes, only the very expert avoid
a close encounter with the bog), take some
afternoon tea, and prepare for bed. Journey time to
Bujuku is 5-6hrs.
Out of the bog, and a short climb later, Lake
Bujuku will be sighted. Giant groundsel abounds.
To get to Bujuku
Hut, Lake Bujuku is skirted to the
east. This is no easy task as the banks are
generally quite muddy even in the dry
season. Bujuku Camp is fairly cold, but if you are
lucky there may be a spot of afternoon sunshine to
warm you up. You will almost certainly need to dry
off a few clothes (yes, only the very expert avoid
a close encounter with the bog), take some
afternoon tea, and prepare for bed. Journey time to
Bujuku is 5-6hrs.
Day 4: Bujuku - Elena
 From Bujuku, one may hike up to Mount Speke
directly, or to Mt Stanley and hence Margherita,
via Elena Hut. The trip from Bujuku to Elena
usually calls for a late start, since the journey
is short (3-4hrs) and Elena quite cold (you don't
want to get to Elena too early in the day —
there is nothing much to do there but brave the
cold and wind).
From Bujuku, one may hike up to Mount Speke
directly, or to Mt Stanley and hence Margherita,
via Elena Hut. The trip from Bujuku to Elena
usually calls for a late start, since the journey
is short (3-4hrs) and Elena quite cold (you don't
want to get to Elena too early in the day —
there is nothing much to do there but brave the
cold and wind).
The trail from Bujuku leads up a fairly huge and
intimidating ridge. Rising on the Western side of
Lake Bujuku, the ridge leads up to Scott Elliot
Pass at 4500m and on to Elena. The climb is quite
steep for the most part, and vegetation thins
noticeably the higher one climbs, until Scott
Elliot Pass where the trail consists of
moss-covered rocky ground with no trees.
 The trek up to Scott Elliot pass is one of the
hardest of the entire journey, as it involves a fairly
rapid ascent at high altitude. At the Pass, trekkers
heading to Elena bear right towards Elena Hut, while
those heading to Kitandara bear left and start to
decend.
The trek up to Scott Elliot pass is one of the
hardest of the entire journey, as it involves a fairly
rapid ascent at high altitude. At the Pass, trekkers
heading to Elena bear right towards Elena Hut, while
those heading to Kitandara bear left and start to
decend.
Heading to Elena from Scott Elliot Pass, one can
soon spot Elena Hut, perched atop a huge rock. (It
will however take another 30-45 minutes to reach
the camp, thanks to huge rock ravines that have to
be crossed.) The
ground consists of large, fairly flat bare
rocks, without any vegetation. This part of the
trail can be quite treacherously slippery if there
has been rain.
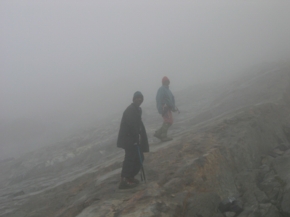
Day 5: Elena - Margherita - Kitandara
 Perhaps the longest day of the entire journey, an
early start is required. Your guide will determine
if the trip to Margherita is possible based on
weather conditions. Elena is frequently enveloped
in clouds which degrade visibility, making a trek
over the glaciers hazardous. Snow
and rain are also likely to put a damper on any
plans. (Forget weather forecasts; The weather at
that altitude changes by the minute!)
Perhaps the longest day of the entire journey, an
early start is required. Your guide will determine
if the trip to Margherita is possible based on
weather conditions. Elena is frequently enveloped
in clouds which degrade visibility, making a trek
over the glaciers hazardous. Snow
and rain are also likely to put a damper on any
plans. (Forget weather forecasts; The weather at
that altitude changes by the minute!)
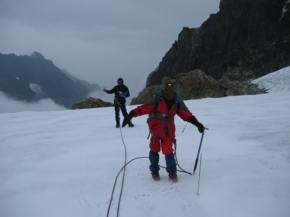
By 6am, your guide should have assessed the
situation well enough to determine whether the
peaks can be attempted. Assuming all is well, you
should head out of camp by 6.30am, heading over the
large flat rocks, through deep ravines, climbing up
to the snow line. You will have carried crampons,
ice axes and ropes. At the snow line, the crampons
are attached to your hiking boots, and all members
of the team roped and
harnessed together. The trek across the glaciers
begins.
 The first glacier one crosses is a rather small
one, leading up to a small rocky outcrop, which one
crosses before reaching the main Stanley
Plateau. This is a large glacier, perhaps 1km
across in any direction. The ice is extremely
hard, rock solid, and one has to kick hard into the
ground with the
crampons to gain good traction. Crossing the
Stanley Plateau takes 30-45 minutes, and involves little
or no climbing. At the southeast end of the
plateau, you leave the plateau and descend through
a rocky ravine (crampons still on, so caution is
advised!) to join the margherita glacier.
The first glacier one crosses is a rather small
one, leading up to a small rocky outcrop, which one
crosses before reaching the main Stanley
Plateau. This is a large glacier, perhaps 1km
across in any direction. The ice is extremely
hard, rock solid, and one has to kick hard into the
ground with the
crampons to gain good traction. Crossing the
Stanley Plateau takes 30-45 minutes, and involves little
or no climbing. At the southeast end of the
plateau, you leave the plateau and descend through
a rocky ravine (crampons still on, so caution is
advised!) to join the margherita glacier.
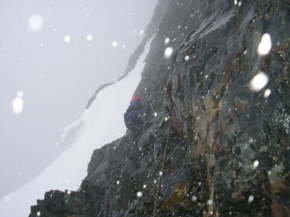
Joining the Margherita glacier, the really hard
work begins. This part of the trail is quite steep
as you go higher, and the ground covered in thick
snow, which greatly reduces the effectiveness of
the crampons in ensuring traction. It will
typically take 2-3hrs to climb to the top of this
glacier. Hazards abound, including deep crevices
(many of which are often hidden by snowfall), and
the constant risk of losing ones footing! Matters
are not helped by the high altitude and attendant
fatigue. Careful use of your ice axe to anchor your
every move, as well as paying close attention to
your guide's advice and actions should help make
this a less nerve-wracking trek!
 At the top of the glacier, you meet a vertical rock
face with ropes dangling from above. At this point
your guide will climb up the rock face and
carefully belay you up the rock face onto a small
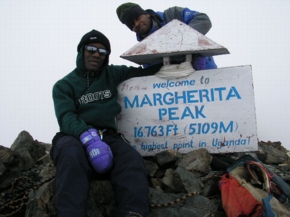
ledge. From this point the peak is clearly visible
a short distance away. What's left is a short
scramble over the rocky ridge to reach Margherita
Peak, the highest point in Uganda. The euphoria of
the moment is perhaps only tempered by the thought
of the hazardous journey back!
At the top of the glacier, you meet a vertical rock
face with ropes dangling from above. At this point
your guide will climb up the rock face and
carefully belay you up the rock face onto a small
ledge. From this point the peak is clearly visible
a short distance away. What's left is a short
scramble over the rocky ridge to reach Margherita
Peak, the highest point in Uganda. The euphoria of
the moment is perhaps only tempered by the thought
of the hazardous journey back!
Given the fact that the summit is quite exposed and
therefore windy (and rainy/snowy sometimes), a
short stay is advised, followed by a rapid
descent. While the trip up to Margherita takes
4-5hrs, the trip back down to Elena takes 2-3hrs.
At Elena, a short tea break is necessary before the
3-4hr trek down to Kitandara camp.
The trail to Kitandara passes over mostly bare or
moss-covered rocks down to Scott Elliot Pass. This
section is quite treacherous, particularly if it
has rained or snowed. At Scott Elliot Pass, the
trail turns right, heading into a deep gorge. You
are advised to keep the noise level down because of
the risk of rock avalanches in the gorge. You
should be able to see Upper Kitandara Lake
in the distance.
Kitandara camp is reached via a series of short but
tiring ridge climbs and descents, through wooded
(and usually muddy)
terrain. It is important to leave Elena early to
ensure an early arrival at the camp.
Day 6: Kitandara - Guy Yoeman
 Given that Kitandara Camp is fairly warm (warmer
than Bujuku, even though it is at a higher
altitude), the night spent here will be one of the
more pleasant. An early start is advised, as the
trek to Guy Yoeman is demanding and potentially
long.
Given that Kitandara Camp is fairly warm (warmer
than Bujuku, even though it is at a higher
altitude), the night spent here will be one of the
more pleasant. An early start is advised, as the
trek to Guy Yoeman is demanding and potentially
long.
Heading out of camp, one must ascend a steep
incline
to reach Freshfield Pass. This climb takes 45-60
minutes and is quite demanding. At Freshfield Pass,
the descent down the mountain begins. Passing first
over moss-covered rocky ground, the trail descends
into the bog-covered Mubuku River valley. Much of
the terrain is criss crossed by small streams, and
the going can be tough as the trail generally
consists of either slipper rock or muddy bog.
 Guy Yoeman can generally be seen from a great
distance away along this part of the trail, as can
Nyabitaba (on a clear day). After the bog, one passes
under a major cliff (passing a camp site used by the
Duke of Abruzzi in his quest for the peaks), heading
down into the corniferous forests and on to Guy
Yoeman. Total journey time is 4-6hrs depending on
weather and terrain conditions.
Guy Yoeman can generally be seen from a great
distance away along this part of the trail, as can
Nyabitaba (on a clear day). After the bog, one passes
under a major cliff (passing a camp site used by the
Duke of Abruzzi in his quest for the peaks), heading
down into the corniferous forests and on to Guy
Yoeman. Total journey time is 4-6hrs depending on
weather and terrain conditions.
Day 7: Guy Yoeman - Nyakalengija
 The last day's trek leads out of Guy Yoeman, through
wet/boggy forests, down a number of ridges into the
Kichuchu (meaning "dusty place") cliff
area. In parts this trail is quite steep and
slippery. There is a particularly vertiginous spot near Kichuchu
that will test even the strongest nerves! Here, the trail
crisscrosses a stream flowing down a steep, slippery
rock face. Some supports (in the form of wooden
steps) have recently been installed, but the
particular spot is still quite trying!
The last day's trek leads out of Guy Yoeman, through
wet/boggy forests, down a number of ridges into the
Kichuchu (meaning "dusty place") cliff
area. In parts this trail is quite steep and
slippery. There is a particularly vertiginous spot near Kichuchu
that will test even the strongest nerves! Here, the trail
crisscrosses a stream flowing down a steep, slippery
rock face. Some supports (in the form of wooden
steps) have recently been installed, but the
particular spot is still quite trying!
Past Kichuchu the trail heads into bamboo forest,
continuing to descend, up to Kicucu Bridge,
crossing point on the Mubuku River. The trail then
climbs through more bamboo forest, following the
western bank of the Mubuku River valley. The trail
soon begins to descend down the Nyabitaba ridge,
leading to Nyabitaba Camp.
 It takes 3-4hrs to reach Nyabitaba Camp. Assuming
an early start from Guy Yoeman, most trekkers
choose to have a quick snack at Nyabitaba, and
head down to the Park HQ, a journey that takes an
additional 2-3hrs. This is generally familiar
territory, and will typically be covered quite rapidly,
particularly since it is also largely downhill.
It takes 3-4hrs to reach Nyabitaba Camp. Assuming
an early start from Guy Yoeman, most trekkers
choose to have a quick snack at Nyabitaba, and
head down to the Park HQ, a journey that takes an
additional 2-3hrs. This is generally familiar
territory, and will typically be covered quite rapidly,
particularly since it is also largely downhill.
|